Save a File and Close Word
You must save your documents if you wish to recall them later. You can use the Save option on the Microsoft Office menu, to save a document. You can also save a document by typing Ctrl+s. The first time you save a document, the Save As dialog box appears. Use the Save as dialog box to locate the folder in which you want to save your document and to give your document a name. After you have saved your document at least once, you can save any changes you make to your document simply by clicking the Save after you click the Microsoft Office button.
 The following exercise shows you how to save the file you just created and close Word. You will name your file Lesson Two.
EXERCISE
Save a File—Windows Vista:
· Click the Microsoft Office button. A menu appears.
· Click Save. The Save As dialog box appears, if you are saving your document for the first time.
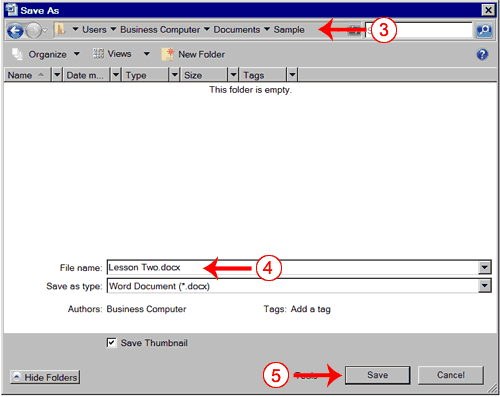
· Use the Address bar to locate the folder in which you want to save your file.
· Name your file by typing Lesson Two.docx in the File Name box.
· Click Save.
· Click the Microsoft Office button. A menu appears.
· Click Exit Word, which is located in the bottom-right corner of the window. Word closes.
Save a File—Windows XP
· Click the Microsoft Office button. A menu appears.
· Click Save. The Save As dialog box appears if you are saving your document for the first time.
· Specify the correct folder in the Save In box.
· Name your document by typing Lesson Two in the File Name box.
· Click Save.
· Click the Microsoft Office button. A menu appears.
· Click Exit Word, which is located in the bottom-right corner of the window. Word closes.
Every time you save your document, you overwrite the previous version of your document. For example, you create a document and save it. Later you delete several passages from the document and then save your changes. The passages from the first draft of the document no longer exist. If you want to save both the original draft of your document and the revised document, you must save the second draft of the document using a different name. To save the document using a different name, click the Microsoft Office button. A menu appears. Click Save As. The Save As dialog box appears. Use the File Name box to give your document a new name.


0 comments:
Post a Comment
Enter your comments to JoxTech